

The right hook is a compact power punch that travels in a curved, horizontal path. This guide teaches the right hook from an orthodox stance, where the right hand is the rear hand. A southpaw athlete can also throw a right hook, but it functions as the lead hook because the right side is forward.
The name describes the hand that punches—not whether the hook is lead or rear. Unlike a right cross, which travels straight toward the target, the right hook keeps the elbow bent and sweeps around the opponent’s guard.
Right Hook at a Glance
- Stance shown: Orthodox—left side forward, right side back
- Striking hand: Anatomical right hand
- Power source: Rear-foot pivot, hip rotation and shoulder rotation
- Punch path: Compact horizontal arc with the elbow bent
- Best practice: Train on pads or a heavy bag under qualified supervision
How to Throw a Right Hook: Step by Step
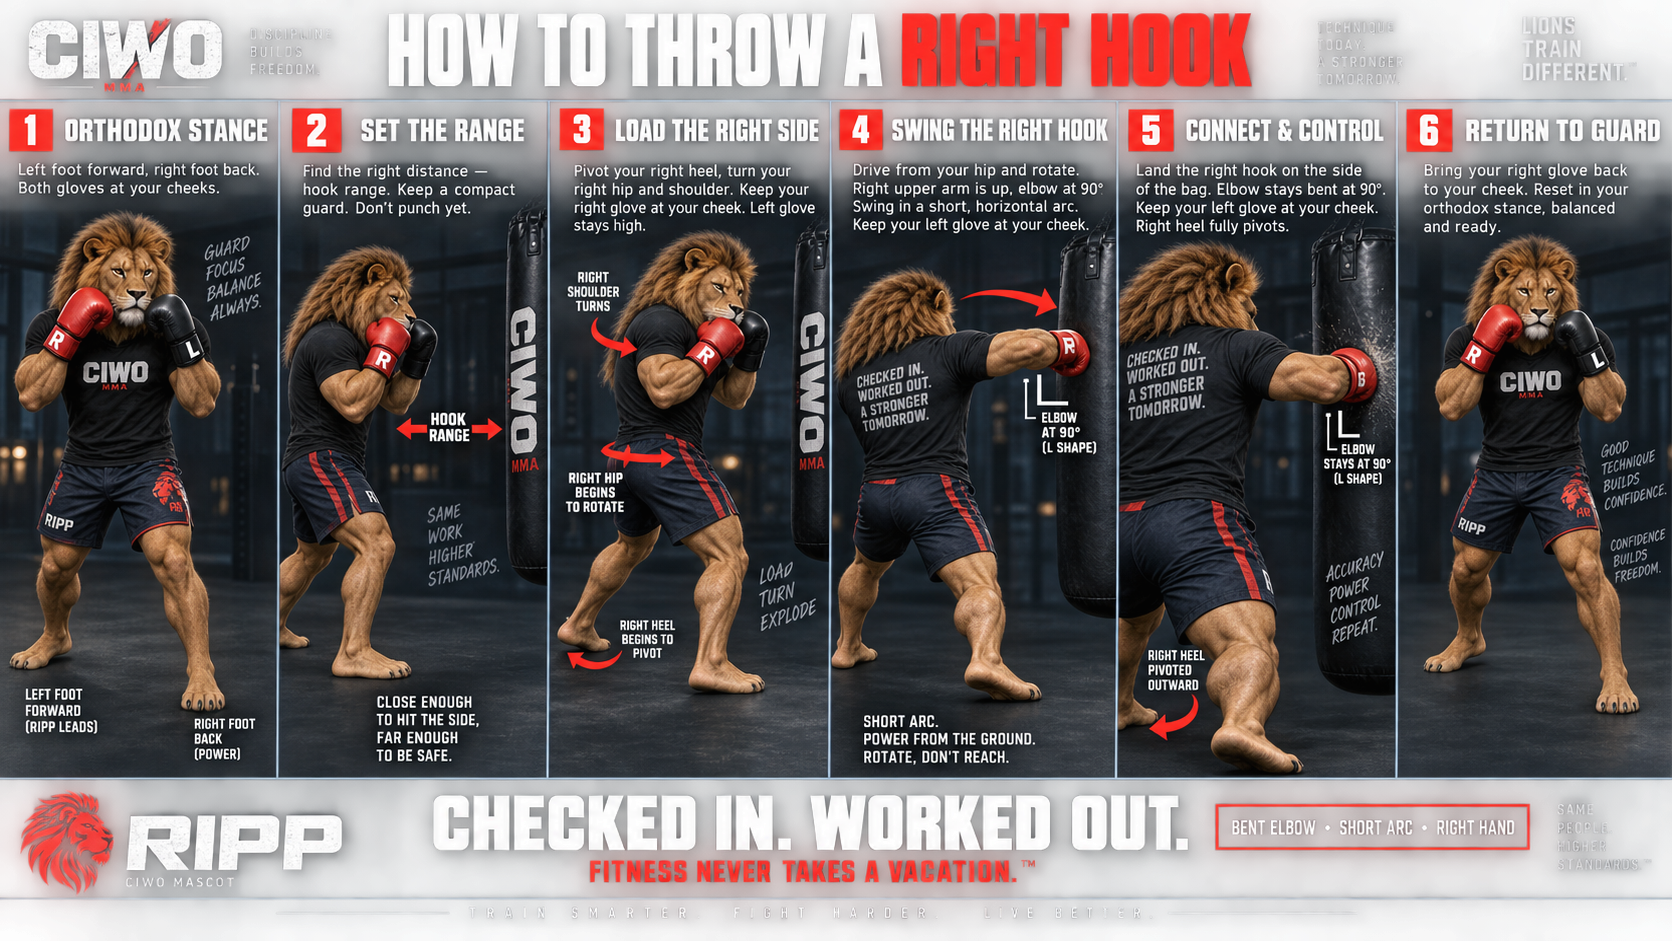
1. Begin in an Orthodox Fighting Stance
Place your left foot and shoulder forward with your right foot and shoulder behind you. Keep your knees soft, chin tucked and both gloves near your cheeks. Distribute your weight so you can rotate without losing balance.
2. Establish the Correct Range
A hook is a mid-to-close-range punch. Use a jab, feint or small step to enter range without reaching. If you must straighten your arm to touch the target, you are too far away for a clean hook.
3. Protect Your Chin and Brace
Keep your chin behind the left shoulder and your left glove high. Brace your midsection without holding your breath. Avoid pulling the right hand backward to announce the punch.
4. Pivot the Rear Foot and Rotate
Turn on the ball of your right foot so the heel rotates outward. Allow the right knee, hip and shoulder to turn together. The punch begins from the floor and travels through the body rather than being thrown with the arm alone.
5. Sweep the Right Glove Through a Tight Arc
Maintain roughly an 80- to 100-degree bend at the right elbow and keep the wrist straight. Sweep the glove horizontally around the target with the forearm generally parallel to the floor. Use a compact path—do not extend it like a cross or swing it like a looping haymaker.
6. Make Controlled Contact and Return to Guard
Contact the pad or bag with the knuckles aligned behind a neutral wrist. Stop the rotation before your balance breaks, then retract the right glove immediately to your cheek and reset your feet under you.
Right Hook vs. Right Cross
- Right hook: Bent elbow, compact curved path and mid-to-close range.
- Right cross: Straighter arm path traveling directly down the center at longer range.
If the right arm becomes nearly straight and travels directly forward, the technique has changed from a hook into a cross.
Watch RIPP Demonstrate the Right Hook
Use the accompanying vertical CIWO video to study the stance, bent-elbow path and return to guard. Replay it at reduced speed, then rehearse the movement slowly in shadowboxing before adding resistance or power.
Common Mistakes and Corrections
- Straightening the right arm: Move closer and preserve the elbow bend so the glove follows an arc.
- Dropping the left hand: Keep the non-punching glove protecting the cheek and temple.
- Winding up: Launch from guard without pulling the glove backward.
- Using only the arm: Pivot the rear foot and rotate the hip and shoulder as one connected action.
- Bending the wrist: Keep the fist, wrist and forearm aligned at contact.
- Over-rotating: Finish in balance and avoid allowing the rear shoulder to pull you past the target.
- Throwing from too far away: Use footwork or a setup to enter hook range first.
Right Hook Setups and Combinations
- Left jab → right hook: Use the jab to measure distance and occupy the guard.
- Double jab → right hook: Step into range behind the second jab.
- Left body jab → right hook to the head: Change levels before rotating upstairs.
- Right hook → left hook: Recover your stance between punches and keep both arcs compact.
- Jab feint → right hook: Draw a defensive reaction without telegraphing the hook.
Practice Progression
- Shadowbox: Perform 3 rounds of 1 minute at low speed, pausing after every hook to check balance and guard.
- Heavy bag: Complete 3 sets of 8 controlled right hooks, resetting fully after each repetition.
- Focus mitts: Practice the punch in combinations with a qualified coach or partner.
- Video review: Record from the front and side to verify that the elbow stays bent and the glove follows a hook path.
Safety Notes
Use properly fitted hand wraps and gloves for bag or pad training. Begin with technique rather than maximum power, and do not use hard contact during unsupervised partner drills. Stop if you feel sharp pain in the hand, wrist, elbow or shoulder. If a strike causes possible concussion symptoms—including headache, dizziness, confusion, nausea or vision changes—stop immediately and seek appropriate medical evaluation.
Frequently Asked Questions
Is a right hook always a rear hook?
No. It is a rear hook in an orthodox stance and a lead hook in a southpaw stance. The name identifies the right hand.
Should my palm face down or inward?
Both orientations are taught in striking systems. Use the position your coach recommends while keeping the wrist straight and the knuckles aligned. Avoid twisting the wrist into an uncomfortable angle.
How hard should beginners throw?
Start slowly enough to control the full motion and return to guard. Add speed and power only after the punch remains compact, balanced and repeatable.
The hook lands with rotation. The discipline is returning to guard.
RIPP the Lion
Keep Training with CIWO
Build your striking toolkit one well-practiced technique at a time. Explore CIWO training gear and accessories that can help you stay prepared at home, in the gym or on the road.
Some shop links may be affiliate links. CIWO may earn a commission from qualifying purchases at no additional cost to you.
This content is for general educational purposes and is not a substitute for personalized instruction, medical advice or professional safety supervision.
Checked In. Worked Out. Fitness never takes a vacation.™
Technique Development and Drilling
How to Throw a Right Hook should first be practiced slowly enough to maintain stance, balance, guard and a controlled return to position. Speed and power are useful only when the mechanics remain repeatable.
Beginner progression
Start with shadowboxing or a cooperative technical drill. Build accuracy before adding a heavy bag, pads or live resistance. Increase speed gradually and reset after every repetition rather than allowing fatigue to turn the drill into uncontrolled movement.
Defense after the strike
Do not treat the strike as finished at contact. Recover the hand or leg, restore the guard, regain stance and be prepared to move, defend or continue the combination. That recovery is part of the technique.
Common training errors
Typical problems include overcommitting the body, dropping the opposite hand, losing the stance, telegraphing the attack and chasing power before accuracy. Record short practice rounds when possible so you can review posture and recovery.
Safety
Use appropriate gloves, wraps, pads and supervision for contact work. Technical practice should be controlled; hard sparring is not required to learn mechanics and carries substantially more injury risk.
Continue with the CIWO MMA & Combat Training hub and MMA Striking library.